This article is about adding new fillTypes. This can be done as part of a map mod or as part of a different mod, like a production.
Adding the fillType is mostly the same for both types of mods.
Fill Types can somewhat be split into two categories:
- Pallet only fill types
- Loose fill types
Fill types are added via a "fillTypes.xml" file. In maps this is usually named "maps_fillTypes.xml" for other mods it can be named something else, but should contain "fillTypes" in the name to indicate clearly what it contains.
Structure of the fillTypes xml
The fillTypes xml consists of several parts, some of which are only needed for specific fillTypes.
- fillTypeConverters - this section is only needed for some fillTypes, like new grass types that can be tedded into hay
- fillTypes - in this section the actual fillTypes are defined
- fillTypeCategories - this section determines where which fillType can be used, eg which fillTypes can go into a regular grain trailer
- fillTypeSounds - in this section fillTypes can be assigned specific sounds used when loading/tipping/overloading the fillType ingame (eg patotoes sound different then wheat when tipped onto the ground)
Every fillType has to have an entry in the fillTypes section and should have an entry in the fillTypeCategories section.
The fillTypeConverters section is only needed in specific circumstances.
The fillTypeSounds section is optional. When you do not define it, your fillTypes will use a generic sound by default.
The fillType definition
Each fill type has a fillType definition in the fillTypes section.
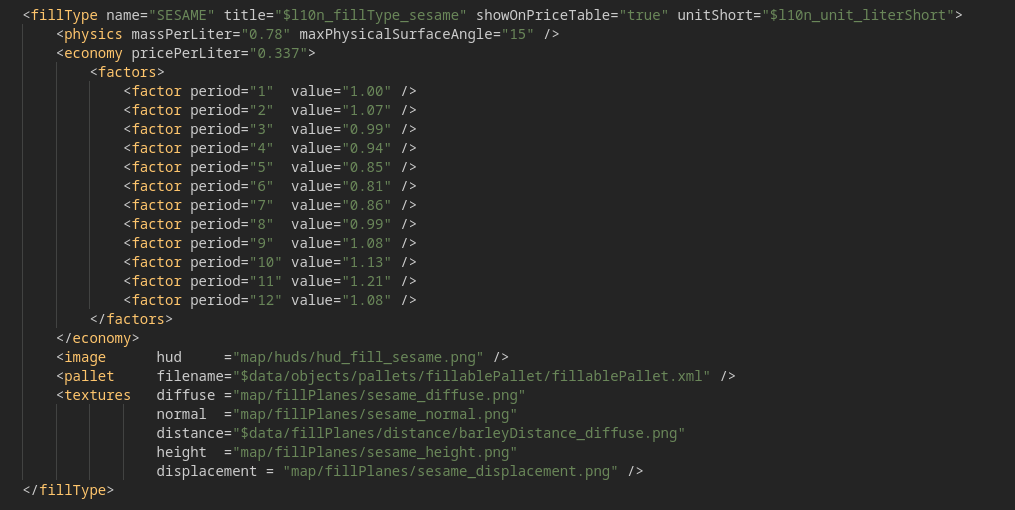
The opening tag contains general information like the internally used name, the name as displayed ingame (usually as a l10n reference) and whether or not this fill type should be visible in the price menu.
The physics tag contains information about the mass and the surface angle of the fill type.
The economy tag contains the information about the price and potential fluctuation of the price over the ingame year.
The image tag contains the path to the hud icon.
The textures tag contains the paths to the fillPlane textures (this is not needed for pallet only fill types).
The pallet tag contains the path to the pallet xml for this fill type (this is needed for ALL fill types, but for bulk fill types can be set to a default basegame fillable pallet).
Pallet only fill types
These are fill types that only exist in a pallet form. Most products from productions are pallet only fill types (eg preserved beetroot/carrot/parsnip). These fill types cannot be put eg in a trailer or tipped on the ground. They are always in a pallet. (eg you get a pallet from a production and you sell the pallet)
To create a pallet only fill type, you need a custom pallet and a hud icon (this is the icon that is displayed in the menus and next to the fill level indicator bar ingame to represent the fill type). fillPlane textures are not required.
The hud icon has to be a 256x256px, BC7 with 3 Mipmaps.
For information on making a custom pallet, see the Pallet section below.

Loose material fill types
These are fill types for loose material like grain, wood chips, etc. Things that can be loaded into a trailer and tipped to the ground.
If your new fill type should be able to be tipped to the ground, it can usually only be added with a map, as making it possible to tip it to the ground requires adding an additional channel to a densityMap, which is part of a map. There is a section below that deals with this specifically.
Loose material fill types need fillPlane textures, as these are the textures used to show the fill type in a trailer or on the ground.
These are the textures required:
- fillPlane diffuse - 1024x1024px, 9 Mipmaps, BC7
- fillPlane normal - 1024x1024px, 9 Mipmaps, BC1 - "green", world/object space normal map, NOT "purple" tangent space normal map!
- displacement - 32x32px, 1 Mipmap, BC4
- height - 512x512px, 8 Mipmaps, BC4
- fillPlane distance - 256x256px, 7 Mipmaps, BC7
- hud icon - 256x256px, 3 Mipmaps, BC7
The height texture can be created by scaling down the normal and then converting it to greyscale. The displacement texture can then be created by scaling the height texture down.
While loose material fill types also should have a pallet, as long as they are added to the "BULK" fill type category, they can use the basegame fillable pallet and thus do not need a custom pallet to be created.
Fill type categories
Most machines in the game interact with fill types via fill type categories. For example a normal grain trailer accepts fill types of the category BULK and a farm silo can store fill types of the category FARMSILO.
From this example you can already guess that any fill type can be in multiple categories at once.
When adding a new fill type, we need to also add it to all relevant categories, so that machines and buildings can correctly handle it. The good thing however is, that this means that just by adding the fill type to the correct category we will have added it to all vehicles that use this category. For example, adding a fill type to the category BULK will automatically cause all regular grain trailers to now accept the new fill type.
If we have specific machines, we can also add our own new fill type category in this section of the fillTypes xml and then use it in our machines or buildings.
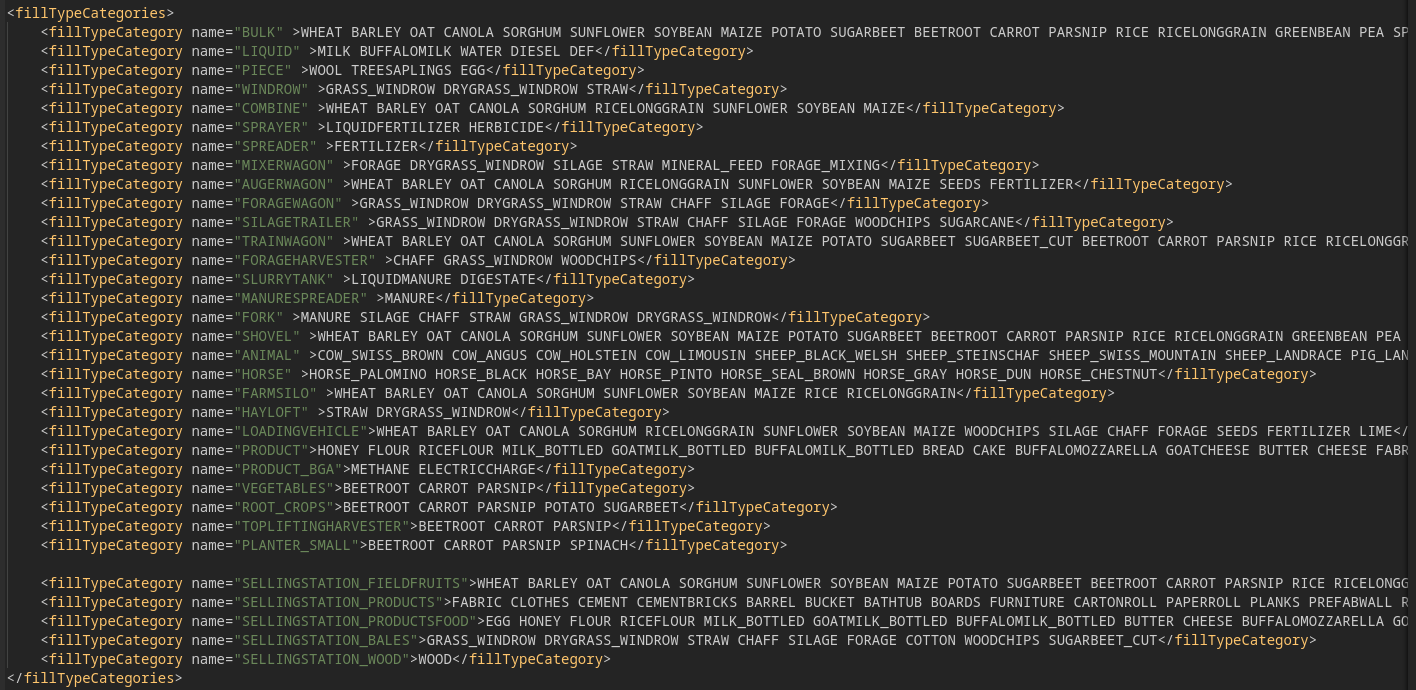
The screenshot shows an excerpt of the FS 25 basegame maps_fillTypes.xml with most of the fillTypeCategories section visible. You can use this as a guideline for creating the fillTypeCategories section in your own fillTypes xml, but you do NOT need to add the basegame fill types to it. In your mods fillType xml ONLY add things additional to basegame.
The following is a list of the FS 25 basegame fillTypeCategories and where not self-explanatory a brief explanation what it is used for/what it means:
- BULK - Most regular trailer and grain trailers
- LIQUID
- PIECE - Some things that are not measured in liters, but in pieces
- WINDROW - Grass, Hay, Straw
- COMBINE
- SPRAYER - Fertilizer & Herbicide sprayers
- SPREADER - Fertilizer spreaders
- MIXERWAGON - mixers for making animal food
- AUGERWAGON
- FORAGEWAGON
- SILAGETRAILER - Trailers specifically for transporting chaff/silage
- TRAINWAGON - Most train cars
- FORAGEHARVESTER
- SLURRYTANK
- MANURESPREADER
- FORK
- SHOVEL
- ANIMAL - All the different breeds of animals (except horses), afaik only used for animal trailers
- HORSE - All the breeds of horses, afaik only used for animal trailers
- FARMSILO - Everything that can go into a regular farm silo
- HAYLOFT - Everything that can be stored in a hay loft
- LOADINGVEHICLE
- PRODUCT - Things produced in productions
- PRODUCT_BGA - Things produced in BGAs
- VEGETABLES
- ROOT_CROPS - Carrot, Parsnip, Beetroot
- TOPLIFTINGHARVESTER - Harvesters for root crops (see above)
- PLANTER_SMALL - Planters for root crops (see above)
- SELLINGSTATION_FIELDFRUITS
- SELLINGSTATION_PRODUCTS
- SELLINGSTATION_PRODUCTSFOOD
- SELLINGSTATION_BALES
- SELLINGSTATION_WOOD
Note that the names for fillTypeCategories are always in all caps and contain only letters and if necessary underscores ( _, in place of spaces). If you create your own new category, you should follow this rule for naming it.
IMPORTANT: Adding a fill type to a category will add it to machines and/or buildings using this category, but this does NOT mean that they will then work with this new fill type correctly! Example: You could add eggs to the BULK category, which would add them to most trailers, but emptying an egg pallet into a trailer may not work or would at least create errors as eggs are not meant to be loose items in the game and do not have the textures required for showing them in a trailer. Similarly, you can add tomatoes to the category FARMSILO, but doing so will cause errors and while it may allow you to put tomatoes into the silo, you would not be able to get them out again, because tomatoes can only exist in pallet form and not as loose material and the silo does not have the ability to create pallets. You can only get loose material out of silos, not pallets. Adding pallet only fill types to the silo does not change this!
Fill type sounds
Fill type sounds are used when loading and unloading fill types. For example the sound you hear when filling a trailer with grain from your silo. Each fill type is assigned to ONE sound, though THERE IS A DEFAULT which is used if you add a fill type and do not assign it any specific sound.
You assign new fill types to a sound by creating a soundType tag inside the soundTypes section of the fillType xml and adding the fill type(s) to the fillTypes attribute of this tag. Inside this tag is a single element <sound template="..."/> where the template attribute holds the name of the sound to be used.
As mentioned above, if you do NOT assign your new fill type to a specific sound, it will use the default sound.
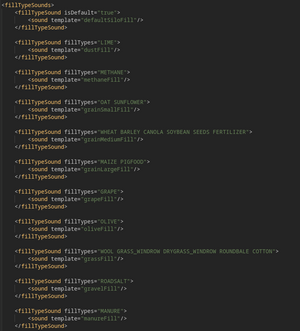
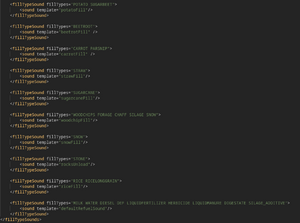
Below are several screenshots showing the entire fillTypeSounds section of the FS 25 basegame maps_fillTypes.xml, which you can use to find the correct template names for your fill types.
Fill type converters
Fill type converters are used by some machines that convert one fill type into another. Examples of this are tedders, which convert grass to hay and sugar beet cutters, which convert sugar beet to cut sugar beet.
As this functionality is only required in some, relatively rare cases, adding a fillTypeConverters section to your mods fillType xml is entirely optional and in most cases probably not required.
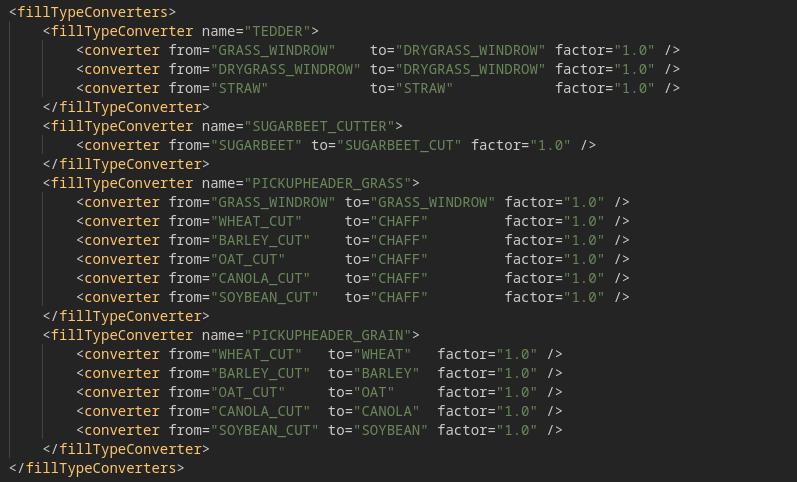
The fillTypeConverters section of a fillType xml can contain multiple fillTypeConverter sections. Each fillTypeConverter is identified by a name and contains one or more converter elements, each of which have three attributes: from, to and factor.
The way these work is simple: The fill type in the "from" attribute will be converted to the fill type in the "to" attribute and in this conversion the amount will be multiplied by the "factor" attribute. For example, this converter <converter from="GRASS_WINDROW" to="DRYGRASS_WINDROW" factor="2.0" /> would convert 1 liter of grass to 2 liters of hay. The basegame converter for this conversion uses a factor of 1.0 resulting in 1 liter of grass being turned into 1 liter of hay.
Machines use the name of a fillTypeConverter to identify and use it. If you have special machines that should do some form of fill type converting you can create your own new fillTypeConverter, or you can add new fill types to existing converters by re-using the same name (eg for adding new grass types like clover that should also be able to be tedded).
The screenshot shows the FS 25 basegame fillTypeConverters section with all its content. You can use this to write your own fillTypeConverters section in your mods fillType xml if needed.
Custom pallets
Coming soon...
Adding a loose fillType to densityMap_height
In order to be able to tip a loose fillType to the ground, it needs to be added to the densityMap_height.gdm file and the maps_densityMapHeightTypes.xml file. Without a lua script this is only possible in map mods!
This section assumes that you are working on a map mod!
FillTypes that can be tipped to the ground are often referred to as height types.
Basegame FS 25 (at the time of writing this, January 1st 2025) uses 47 height types and a densityMap_height.gdm with basegame settings supports up to 63 height types. This means if you are adding less then 17 height types, you will only need to make changes to the maps_densityMapHeightTypes.xml file for your map.
Adding a fillType to maps_densityMapHeightTypes.xml
First ensure that your map has a custom maps_densityMapHeightTypes xml file and if not copy the basegame file at data/maps/maps_densityMapHeightTypes.xml to your map and in your map xml ensure that you have a line like this:
<densityMapHeightTypes filename="map/maps_densityMapHeightTypes.xml" />
And ensure that the filename here is pointing to the maps_densityMapHeightTypes.xml in your map correctly.
Now open the maps_densityMapHeightTypes.xml of your map in a text editor.
In this file you will find a lot of small sections (each taking 3 lines) like this:
<densityMapHeightType fillTypeName="WHEAT" maxSurfaceAngle="26" fillToGroundScale="1.0" allowsSmoothing="false">

    <collision scale="1.0" baseOffset="0.08" minOffset="0.0" maxOffset="0.08" />

</densityMapHeightType>
Locate one of these for a fillType (recognizable by the fillTypeName attribute) that is similar to the fillType you want to add. For example if you want to add MILLET, find SORGHUM as they are similar and if you want to add ALFALFA, find GRASS, as those are similar.
Then copy the three lines for the similar fillType and go to the very end of the file. There, just above </densityMapHeightTypes>, paste the three lines you copied. Then change the name of the fillType in fillTypeName in the lines you just pasted to the fillType you want to add.
Now save the file and you are done! You should now be able to tip the new fillType to the ground on your map!
Increasing the number of height types
If you want to add more then 16 new height types, you will need to increase the number of channels on the densityMap_height.gdm file.
First, use the GRLE-Converter from Giants to convert the densityMap_height.gdm file in your maps data folder to a png of the same name. Then rename or delete the old .gdm file.
Now open the map i3d in a TEXT-Editor and find the line that contains densityMap_height and check that it has .png and not .gdm. If it says .gdm, change this to .png.
Now find the line starting with <DetailLayer name="terrainDetailHeight" in the map i3d.
Now you need to know how many height types you will need in total. As stated before, basegame uses 47 height types. Add the number of height types you want to add on to that number to get the total required height types.
The table below will give you the values you need to adjust in the <DetailLayer name="terrainDetailHeight" line in the map i3d.
| num of height types | numDensityMapChannels | compressionChannels | combinedValuesChannels | heightFirstChannel | heightNumChannels |
|---|---|---|---|---|---|
| 0 - 63 | 12 | 6 | 0 6 0 | 6 | 6 |
| 64 - 127 | 14 | 7 | 0 7 0 | 7 | 7 |
| 128 - 255 | 16 | 8 | 0 8 0 | 8 | 8 |
| 256 - 511 | 18 | 9 | 0 9 0 | 9 | 9 |
| 512 - 1023 | 20 | 10 | 0 10 0 | 10 | 10 |
Select the row in the table above according to the number of height types you want/need. Then change the values for numDensityMapChannels, compressionChannels, combinedValuesChannels, heightFirstChannel and heightNumChannels in the line in the map i3d to match those provided in the table.
Save the map i3d.
Then open the maps_densityMapHeightTypes.xml for your map and at the very top change the value for numChannels to that of heightNumChannels in the table and save this file as well.
Now open the map i3d in GE and save it again. This wil generate a new densityMap_height.gdm file.
You can now delete the densityMap_height.png file that was created by the GRLE-Converter earlier.
Now you have increased the number of height types for your map and you can add the new height types like described in the section above!
